Hannah Overman Koch

Saturday, June 30, 2012

SKY VBS Day 5


Our final day at Vacation Bible School 
2012


SKY VBS Day 5


Our lesson -

No matter where you are...trust God!


Our last craft was...


Cloud Magnets


Each child made 2 magnets to have on their fridge and think of VBS all year!


Here are some of the children's examples


Some children wrote their favorite phrases from the week,


others drew pictures and colored each corner of their clouds!


We had quite an array of beautiful magnets that will grace refrigerators all over town! 


A special thank you to Sue Ann for cutting out 900 clouds with her awesome cricket machine!

And a special thank you to Molly Russell for taking awesome pictures of the cloud magnets for me!


Basic Instructions:

Card stock Paper cut into shapes
We used 3 inch and 2 1/2 inch clouds
Colored Pencils, Crayons and Ball Point Pens
Regular glue sticks, Hot glue, Magnets
Children glued the smaller cloud onto the bigger cloud and my awesome volunteers hot glued the circular magnets onto the back.


I had a fantastic time at SKY VBS this week!  I had so much help and I greatly appreciate everyone's support!  This week meant so much more to me than I could have ever imagined!
I reaped such huge rewards and I thank God for blessing me with the creativity to share with very special little ones.


sharing the joy of working with children on this artist holiday,
hannah


Thursday, June 28, 2012

SKY VBS Day 4


The week is just flying by.....


Day 4 at SKY Vacation Bible School


Our lesson today is:


No matter what happens... trust God!


We had a wonderful Thursday morning with all the kids, talking about the Bible!


Our Children's Minister, Pam found these gems at a Children's Ministry Conference a few months ago.  She gave me one and I immediately felt we needed to use them at VBS.


So after a few phone calls, she was able to get 300 for our kids!

Thank you Pam!


This is a Common English Bible and I wanted it so badly for VBS because the outside cover is a coloring page!  I have never seen a Bible as unique as this.  Each child can connect to God's word unlike never before by making it their own.


I am thrilled to say each child was excited to receive their own Bible and even more excited to color it!


back cover


I discussed how the Bible is 2 parts, the Old Testament and New Testament.  I also discussed how we care for our Bibles and to keep them in a safe place.  I reminded them to not color inside, how we do not want to cover Jesus's words.  And to write their names and 2012 on the first page.


It was special, as everyday has become for me during this SKY VBS.  The volunteers are doing a wonderful job and the kids bright smiling faces keeps me coming back every morning!


I wanted to share more Prayer Flags photos with you.  We had them hanging in our Imagination Station today so the kids could see all their wonderful prayers.


We took them down after classes today to prepare for Sunday's special surprise...stay tuned!


In the mean time....


Aren't they beautiful?...


A little one's praying for her fish named Boo.


I love their simplicity and the self expression each one holds.  I know the parents will treasure these for years to come!


This is my Prayer Flag.  In the right hand, I wrote many, many things I and we as humans do with our hands....


praying with my hands always on this artist holiday,
hannah


Wednesday, June 27, 2012

SKY VBS Day 3


Day 3 at Sky Vacation Bible School


Prayer Flags

We had a marvelous day at VBS!


I first heard about Prayer Flags from Jane LaFazio.  Her article is in the magazine, Cloth Paper Scissors Issue 41 (March/April 2012).  Jane is a part of the Prayer Flag Project.  This was started by Vivika Hansen DeNegre in 2011.  Check out her Prayer Flag Blog here.  You can participate as well!


I was touched by all this and it stuck with me when it came time to decide which crafts this year to use for Vacation Bible School.  My thoughts and heart immediately went to all the children making their own Prayer Flag and hanging them at the Church.  

Now many artists use what they have on hand and attach various items to make their own Prayer Flags, working on them for days or weeks even.  I knew I needed to modify this for the children I would work with and in the time frame of 20 minutes.

After many discussions, we finally decided on using unbleached muslin and fabric pastels.


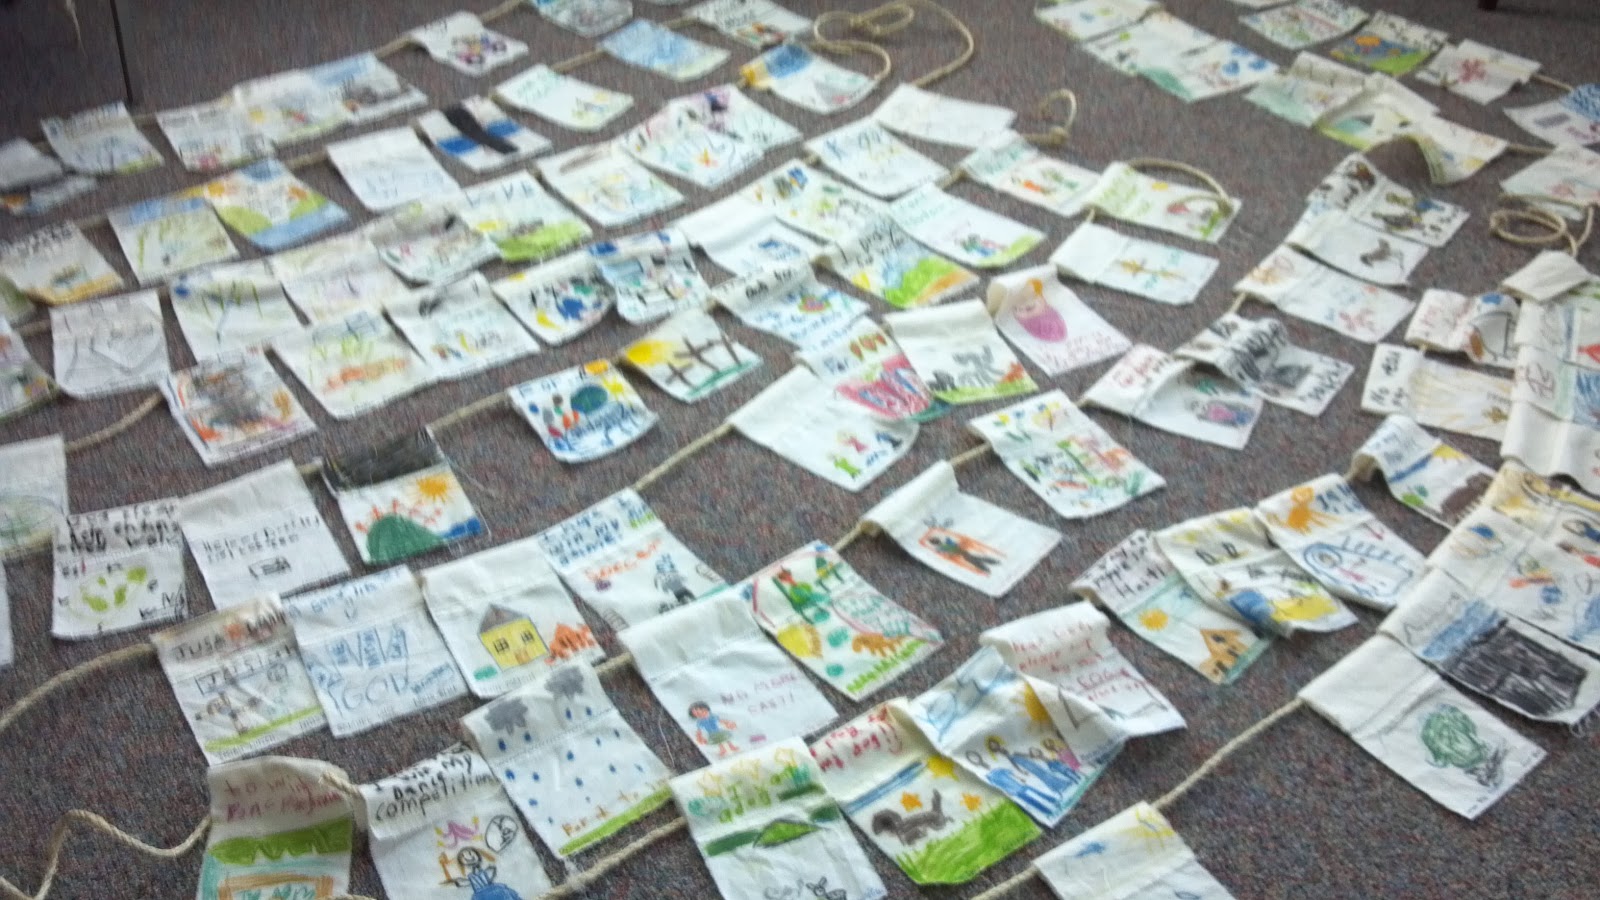
All 241 Prayer Flags cut, sewn and ready for some little prayers


Here is some of my wonderful volunteer's Prayer Flags we did a few weeks ago!


I started today's class talking about today's lesson:

No matter what people do... trust God!

As I discussed our lesson, I moved right into talking about Prayer...

We most often think about Prayer as being on our knees and our hands just so...


and then I asked them....

Did you know you can pray with a pencil?  A pen? A marker?

Their eyes lit up and some said "What?"


I told them... 
You can write your prayer, but you can also
pray by drawing a picture of the very person or thing you are praying for...


I cannot convey on this simple blog the depth we reached today with the Prayers I heard all morning. It was such a truly touching experience to hear what these little ones think and pray about.

So touching....


Praying for endangered animals, Mom and Dad, sisters, brothers, sick Grandparents, pets, doing well in various sports, angels, God, Jesus on the cross, monster trucks, Haiti, orphans, babies born that don't make it out of the hospital, relatives that have died, pets that have died and their new pets.  The list goes on and on..


We decided that tomorrow we will make 2 journal entries, one for today and tomorrow's.  That gave them time to not only draw, but a bit of time to think about what they wanted to pray for first.


I am so fortunate to have 180 prayer flags hanging in my Imagination Station!  By the way, we have big plans for them for the final ceremony!  Pictures will be coming next week.


I greatly encourage you to use this idea in your life.  Using this idea for your own prayers and/or with  children is effective and provides that visual we artists crave.  And with that visual, you will be reminded to say your prayer again and again.

I can assure you that you will be richly rewarded when you not only see, but feel the prayers of the little ones.


I also wanted to share a very special book I recently read, titled Praying in Color by Sybil MacBeth.  This book helped open my eyes to the many ways we can pray.


Thanks once again to the wonderful volunteers who helped the children put their prayers in visual form!


reaping the rewards on this artist holiday,
hannah


Tuesday, June 26, 2012

SKY VBS Day 2


Another exciting day at Vacation Bible School this morning! 


This is an arrangement I made for the front table in my class.  Flowers and weeds from my yard, along with paint brushes we used to paint the pantry sketchbooks.  The container is the empty paint can from painting the pantry sketchbooks.

(I just couldn't throw away that awesome blue color canister - too pretty!)


Today's lesson:

No matter how you feel...trust God!


Here is a journal entry from one of my student's and I just love her flying bird and her pretty hand writing!  So sweet!


I am seeing beautiful journal entries of faces, dragons, unique creatures, bubble letters, shapes, flowers, trucks and so much more.  It is such a good feeling, for me, when the kids do not want to stop drawing.  That warms my heart and tells me how much fun this craft is for them!


But we must continue on to the next craft...


The Easiest Kite Ever!

Not my title, I found instructions here!  They provide a template and details for making this interesting craft.  Check it out!


For our VBS, we used card stock.


Thanks to my wonderful volunteers, all 200 were cut and hole punched, ready for the kids months ago!


This was the string we used.  We cut one short and one long, as per instructions.


Here is a close up of the back of a kite.  All tied and ready to fly, except...


for the kite tail...


Here is the tulle ribbon cut and ready to tie into


gorgeous kite tails ready to staple!


By the way,
 I really got into the part today!  With each class, I literally ran and showed them how the kite works!  I got quite a few laughs, it was awesome!


just flying a kite on this artist holiday,
hannah


Monday, June 25, 2012

SKY VBS Day 1


Welcome to Imagination Station!


Such a fantastic first day of Vacation Bible School!  The kids were excited, all 176 of them that came to my class!  On the agenda today.... introduce them to pantry sketchbooks and start the day's entry.

No matter who you are...trust God!

This was my example I made back in February.


With the help and hard work of AWESOME volunteers, we made 256 pantry sketchbooks-

(60 went to the Tween class)


Tied with red shoe strings!


Cutting, painting,  and drilling holes into....


CEREAL BOXES!!!

That's right, a recycle project as well.
Directions are posted here to make your own!  Decorate the outside as you wish with acrylic paint.  And for this particular project, we painted the cardboard side blue, so when the children open the books, they will see the cereal box that it was!  So exciting!


After discussing how these beautiful books came to be, went through the lesson and made our journal entry, it was time to paint the clouds!

And we did all this in 20 minutes - each class!!  Yes - I have FANTASTIC volunteers!!!

Here they are drying for tomorrow!

Each day, we will make our journal entry and then do another craft!  The kids will take these home on the last day, Friday, full of the week's lessons and their personal drawings!


so much fun journaling ALL morning with the little ones on this artist holiday,
hannah


Sunday, June 24, 2012

Sky Vacation Bible School


I am excited to begin Vacation Bible School at our church this week!

I am craft leader and this year I designed the crafts for the kids, instead of buying kits to prepare.  So with the help of many volunteers, we created by hand what the kids will make and hopefully treasure for years to come.

I love putting my talents to use for such a worthy cause!


I will be adding each craft we do because I am so thrilled and proud of all of our hard work!


beginning to reap some really cool benefits on this artist holiday,
hannah

Friday, June 15, 2012

Tomatoes and Lemons

                                               I am one who believes you reap what you sow.  And for a while now, I have been sharing my creative talents at our church.  Among other things, I am finalizing all our craft activities for VBS this year and I am excited to share those little goodies with you on my blog as well.  But I was also asked if I would be interested in helping teach Sunday School for the month of June.  Not just any type of Sunday School, but Super Sundays, as it was named.  This is a time when you have the same group of kids for 4 straight weeks.  Unlike our regular Sunday School, 1st through 3rd graders switch every Sunday between Storytelling, Art Station, Cooking Station and Games.  As fun as the regular Sunday School may be, this change would make it able for the teachers to focus on one lesson and go more in depth.  I was on board and excited to work with a new friend and excited for her to share her creative love, cyanotypes!  Cyanotypes is something I have been wanting to explore more and really learn about.  This got me thinking; when sharing your God-given talents with any non-profit organization, whether it be a church or food bank, you are rewarded by feeling your work has purpose and helps to define you.  But it's times like these, I can see the hand of God putting exploratory mediums in my path.  It is only then up to me to take hold and enjoy the ride...


                                               My friend, Gina Moreland, does not consider herself an artist.  I beg to differ with her, but I do understand that "artist" is a sacred word to many and my hope is that one day, she too will see herself as I do!  Her passion is cyanotypes.  Beautiful blues and whites capturing nature and unusual images alike.  She has decided to step out of that comfort zone and open herself up to sharing her talents.  This is a big step, as I remember it was a big step for myself to finally live in that special space.

                                               Our Sunday School class titled "Using Artist Tools to Explore God's Greatness" asks the students to stop and take notice of the world around them.  The beauty they see in a cloud, flower, flowing water, and even the inter-workings of their own bodies.  God created these things for us to observe and enjoy and appreciate.  It has been a wonderful class of exploring nature and capturing the essence of it through this unique photographic process.

                                                We had 2 sheets left over that Gina gave to me for my own creative exploration.  Below are the images and a little bit of the process to create a cyanotype...


Once the chemicals have dried on the paper, you can begin to apply your objects.  This is watercolor paper.  This photo is dark because I was in a low lit room.  UV lights can start the process on the paper, not just sunlight.  You can see a little of the yellow tint the paper has where Gina applied the solution.


For my objects I used green tomatoes and lemons.  You have to work fast.


Do you see around the fruit where the paper is still yellow?  It is just beginning the process..


After a few minutes in sunlight, it will start to change.  Do you see the bluish color around the fruits now?


This blue will become darker.  


You can see where the chemical is even changing the lemons blue.


Excitement to see what the end result will be!!!


Once it has been in sunlight for about 6 minutes, it should be ready.  At this time, you rinse the rest of the chemicals off really well.  


Then you add hydrogen peroxide and watch the magic...

Can you see where I am pouring the peroxide, it is a darker blue? 


Rinsed and ready to dry!


A closeup of the many shades of blue!

I just love how the lemon veins went beyond the corner!  That might be my favorite part!


Final product!!!!


Here are the 2 side by side I made!  The one on the left is not totally dry at this point, so it is a little darker.


Many thanks Gina for sharing this process!  I have enjoyed it immensely!!!  I encourage you to go on facebook and "like" Gina's new page titled "The Other Side of Someday":


I hope learning will never cease on this artist holiday-
hannah